


I'm waxing a bit poetic, but if you like mint, rum and lime, this Cuban cocktail was made for you. It's refreshing on a hot day with just the hint of a citrus bite to keep it interesting. On Kentucky Derby day, this wonderful little drink makes a nice change from the traditional mint julep, especially if you aren't into bourbon.
A classic recipe follows. Mint and limes are essential for a
Friday, April 30, 2010
French Impressionist Landscape
When we travel, we are always on the look out for a piece of local art we can bring back home. It could be pottery, a hand carved wood bowl or a painting.

When we were in France we spent some time in Art Galleries and looking at street artists in all of the cities we visited. From Paris to Avignon, we were looking for that certain oil painting that captured the feel of French Country.

We found a charming art gallery on a side street in Avignon that dealt in local artists. We purchased this beautiful painting called Chemin de Provence, which when loosely translated means "way of Provence".

The painting is by artist, Jean Lescure. I love the way it looks in our bedroom.
I love impressionism....what type of art do you like?
Welcome Home,
Penny
Sparkling Star of Persia
 In the shadows before nightfall, the amethyst orbs of Star of Persia twinkle like planets against the purple foliage sky of loropetalum and the constellation of blue scabiosa stars.
Everything looks different in the sunshine as Star of Persia (allium christophii) and the companions revert to their daytime colors. Not a focal point, but an accent—the softball-sized flowers add a hint of sparkle to the garden.

 These are first year bulbs, planted in the autumn of 2009. Tucked in tightly among the foliage of daylilies, scabiosa 'Butterfly Blue', a burgundy loropetalum and perennial creeping heliotrope—the alliums were easy to squeeze into my existing gardens. The short stature makes it easy to obscure the stems and foliage of the alliums.
 Star of Persia is suitable for zones 4a-8b in full sun, well-drained locations. This allium is deer and rabbit resistant.
For over a week now, I've been watching the allium blooms start out compact and slowly expand to the full size orbs. The color is difficult to describe and even more difficult to photograph as the light changes the bloom to cool amethyst, silver, lavender or burgundy.
I'm not even sure if I like my companion color choices with the shades of blue and lavender. I planted the alliums with the scabiosa and heliotrope for a similar bloom time and was going for a monochromatic color scheme.
In hindsight, I believe shades of pink blooms will be better color companions. A bit of tweaking to do for color when I move the bulbs this fall—but I do like the sparkling Star of Persia.
| Words and photos by Freda Cameron, Defining Your Home, Garden and Travel. All company or product or patented names mentioned are registered trademarks/copyrights/patents owned by those respective companies or persons. |
More Spring Blooms
Spring activities in the garden this year have been rather slow mainly because it is still early weatherwise for us but also because we have our house on the market. We had hoped to be moving in time to establish a garden at the new house but that doesn't look like it will be happening. I am plugging ahead working on the area we started last fall so there has been minor improvements there.
Thursday, April 29, 2010
Jelly Cupboard Build Update
Now that I have had some time in the shop I started working on the Jelly Cupboard Build again. I need to get that out of the shop so I can get reorganized and cleaned up to start the WIWW nightstand/beach house nightstand.
I thought I would post a few pics of that I was able to get done tonight.

This is part of the door frame. It is constructed with a half lap joint. There are a couple of ways to accomplish this joint. There are two ways specifically to accomplish this on a table saw (Well Two ways that I know of I am sure there other ways) one is to use a Dado Set which I have loaned out currently, the second and the way that I accomplished this is to use your regular blade and nibble away that the wood.
Essentially I like to figure out the width of my cut set my fence that width and make my first cut. Now if you do this make sure you use your miter gauge with a sacrificial fence, this does a couple of things. It provides support to the back of the wood as well as giving you some additional support on the board you are cutting. I make my first cut with the wood against the fence just touching not real tight on the fence you don’t want to cause a bind or have it kick on you. Now with the first cut made I move the board just a hair to the left to let the blade nibble away at the next piece and then rinse and repeat until I get to the last cut. You will need to do some clean up.
If you look at the board you probably missed some pieces if they are large pieces you can line them up with the blade and cut them out. If they are just fragments of wood hanging there your best bet is a piece of sand paper a 1/4 sheet sander or even a block plane. I opted for the block plane because I have geeked out on using hand tools as much as I can lately. I guess you could use a chisel as well.

Once you have nibbled away at both the boards you will have a joint that looks similar to the one seen here. Now you can see why it’s called a half lap joint. This is a pretty neat Joint and I can see using this in future projects.
As you can see in the previous picture I also drilled a couple of holes for dowels. They are supposed to help reinforce the joint. With modern glue I don’t really think there is a need for reinforcement however from a cosmetic aspect they fit well with this piece.

Here is a quick shot of the body of the cupboard. I had some time to paint part of the inside. I need to finish that up. Obviously the inside will be white and the outside is going to be a grayish/green color. Should be interesting. I am doing it all with milk paint. I will do a post on that at some point as it is somewhat different than regular paint.
At this point I need to finish up the door frame and cut the hinge mortise and get everything mounted. Mrs. Grover will be doing the punched tin for the door. I’m hoping i can get her setup this weekend and get that knocked out.
Have a Great Day!

Notice Something Different?
Here is a picture of my powder room, that I have shown you before.....

Here is a picture taken today. Do you notice anything different?

I found this wonderful porcelain night light in a black toile that almost disappears into the wallpaper!

Here it is with the light turned on....

When we had company over, I felt I needed to leave the light on while they were here. Now the night light is just the perfect amount of light, so my company can find the light switch when they walk into the powder room. It is the perfect ambiant light.
I found it on EBAY, simply type in the words toile night light when searching.
It is the little things that make a house a home...don't you think?
Welcome Home
Penny
What Does Not Belong in Your Compost
Composting is the ultimate in recycling. Food scraps and vegetation are easily turned into the highly desirable soil amendment known simply as compost. Compost can be used as a natural fertilizer for all garden beds, as a potting medium for most container plants including houseplants and even scattered through out the yard to act as a fertilizer for grass and other ground cover. There simply
Wednesday, April 28, 2010
Miter Saw Tuning
Drum roll please…………
I did it. It’s done all the pictures are done for the Miter Saw tuning post. I can’t believe it.
Okay So here we go.
First and foremost when you start this process :
PLEASE READ, FOLLOW, AND UNDERSTAND THE USE AND SAFETY INSTRUCTIONS FOR YOUR SAW AND ALWAYS WEAR YOUR SAFETY GLASSES AND I RECOMMEND HEARING PROTECTION.
MAKE SURE THAT YOUR SAW IS UNPLUGGED DURING THE FIRST SEVERAL PARTS OF THIS TUTORIAL.
Okay now that I have that out of the way. Seriously please take care of yourself and watch what you are doing.
Squaring the Blade to the Fence:
You will need a speed square or some kind of accurate square that you can check 90° and 45°.
Make sure your saw is set and locked at the 0° take your square and lay it on the table to check for 90° make sure the it is flush against the fence. You are looking to make sure there is no gap between the square and the blade. Make sure that you don’t put to much pressure on the blade as it can cause it to deflect.
Now once you feel that the blade is square find a piece of scrap wood and and make a cut with the widest side laying flat on the table.
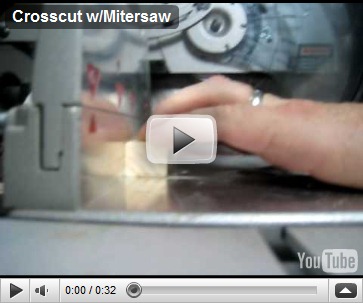
Part of the reason I included a video here was to show some safety precautions. When you are making your cut you want to start the saw close to the the material make a slow and steady cut through the wood. Once you have made the cut leave the blade in the down position and let the blade come to a complete stop. This does a couple of things. It reduces the risk of you sticking your hand in there and trying to grab the wood. It also keeps you from possibly causing the blade to catch the wood and at best chipping at worst possibly throwing the piece at you or across the shop. You will also notice that I keep my hand on the piece through the entire cut, I also as the blade is slowing slide the “non waste” side away from the blade. I don’t know if this is good or not it’s just something that I gave gotten in the habit of doing. In my mind it helps keep the blade from catching the piece as well.
Now once you have made your cut get your straight edge out and align the two pieces against the straight edge.

You will notice that I have labeled one part with a T(top) this is just for orientation. Now take the one piece and flip it over 180° on its top.

Now you want to check for any kind of gap between the two pieces.

Fortunately for me I don’t have any gaps in my pieces so I don’t need to adjust the saw. For this cut. If you do need to adjust this please refer to the manual for your saw. Typically there are bolts that will allow you to adjust where the saw stops.
Checking the 45° Miter Setting:

Just as we did with the 0° setting take your square and set it to check for 45°. Again make sure not to press to hard against the blade and keep the square flush to the fence.

Take a try square or a combination square and check the miter for square also check to see there there are no gaps in the miter itself. We are looking good here no adjustments needed. If you need to make adjustments refer to the manual for your particular saw for adjustment details.
Checking Bevel
Like checking for square set the saw to 0° and make sure you are still square. Now take another piece of scrap and place it on edge and make your cut. Once again take those pieces and align them against a straight edge and the flip one piece like you did before and check for a gap.

Hey guess what. I have a gap. I will be spending a little time adjusting this. Again if you have a gap here refer to your manual to on resolving this issue. Now I need to go find my manual.
You will want to perform a similar cut when you put the blade on a 45° Bevel.

Take your piece on edge and cut a 45° in this piece and another and set up the miter similar to what we did here:

Again make sure to check for square and gaps and refer to your manual.
Sorry to keep telling you refer to your manual but each saw is just enough different that it is important to refer to yours so you can adjust your saw accurately.
I hope this helps you in setting up your saw and providing a little bit of safety and usage guidance. Please feel free to ask me any questions or if you would like to see any other photos please feel free to let me know.
After making the adjustment needed you should have a very accurate saw that will allow you to make nice square cuts and will allow you make the nightstand with ease.
Have a Great Day!Geraniums
I love geraniums. They remind me of window boxes in France.

I filled some of my planters on our front porch with red geraniums and small white and blue trailing flowers.


Some good news about the Potager. It stopped raining and I have filled two of the raised beds with the top soil. Mr. Comforts of Home is finishing building the other two raised beds even as I type this!


What is your favorite garden flower?
Welcome Home,
Penny
How to Grow Potatoes in Potato Planter Bag (3)
Once the potato foliage begins to die back the potatoes are ready for harvesting. They can be harvested earlier as we do if you want the new, small potatoes. Don't expect a huge yield of potatoes. We grow mainly for the new potatoes and a bit of fresh eating, not for storage. Potatoes routinely are on sale $7.99 for a 50 lb bag. I can't grow enough for what we would need to store through the
Tuesday, April 27, 2010
What am I doing?
I am currently reading Make Your Own Guitar by Melvyn Hiscock. I am prepping myself as best I can for my first guitar build. This is hopefully the start of a Career. I’m hoping that over the next 10 years I can develop my skill at building guitars and make a Full Time career of it. It’s a tough business to get into especially competing with the Big dogs out there but I still believe there is a good market for Custom Built and Hand Built Guitars both Acoustic and electric. Like most things I have decided to just teach myself at least in the beginning. I’m sure I will take some classes down the road but for now it’s full steam ahead.
Tomorrow night I plan to go into the shop and finally knock out the post on Tuning a Miter Saw. I hope to have that up tomorrow night or Thursday. Once that post is done I will start on the WIWW Nightstand build and start the post with that. I want to break up each section into it’s own post so you have a step by step guide to building the nightstand. Sorry it has been taking so long on this. I know I got everyone all excited with the Series. I had some really great responses. April is about over and all of my commitments are mostly taken care of so I can spend some time focusing on the series and getting it done right for you.
On a side note…. In a jonesing for something woodworking I tackled a new type of woodworking tonight. Well not so much new as it was adapting some current skills into producing something else. I am excited about it and will post about that as well in the future but for now it is going to be a closely held secret. I think you will find it interesting as well. Tonight was mostly prototyping and figuring out how I wanted to do things. I still have a lot of figuring out to do on the project but think I am well on my way.
I also got to spend sometime in the shop with Grover Jr. tonight. We had a Parent/Child Project that we completed tonight from Home Depot. It was a little shelf kit with the number 20 Home Depot Car. Pretty neat. If you want to spend some quality time with you son or daughter I highly HIGHLY recommend the Lowes Build And Grow Program. I took Grover Jr. to one a few weeks back and we built a Kaleidoscope. There was just something very cool about spending sometime with him just the two of us sharing something that I love with him and seeing him enjoy it.
Here are some pictures after a successful morning of building.


He is a trip. We never could get him to stop making faces. I really totally so don’t know where he gets it from.

Just Hanging Around
I am just hanging around waiting for the rain to stop so I can start working in my garden.

(picture of some of my roses hanging to dry)
What are you doing today? Is it raining? Is the sun shining?
Welcome Home,
Penny
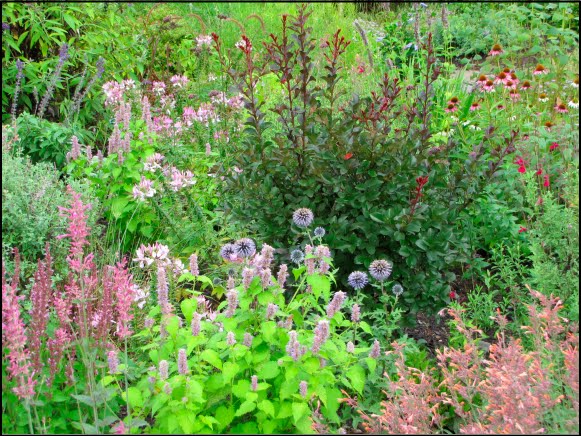
Agastache 'Golden Jubilee' for Foliage and Flowers
 Before the lavender blooms steal the show, the fresh gold leaves of Agastache 'Golden Jubliee' shine in the garden. Plant it beside burgundy foliage, such as crepe myrtle 'White Chocolate' and the display is stellar. The intensity of foliage color for both plants is more intense in spring.
The agastache foliage also provides a great backdrop for the spring-blooming salvias—'May Night', 'Marcus', 'Rose Queen' or 'Caradonna'—as well as with allium 'Purple Sensation'.
In summer, the bottlebrush blooms of 'Golden Jubilee' complement other shapes, such as the blue globe thistle (echinops 'Ritro') or the annual spider flower (cleome). I like to mix Jubilee with different agastache varieties, including 'Salmon and Pink', 'Summer Sky' and 'Heather Queen'.
Jubilee is an agastache for cooler climates, rated for zones 5 through 9 and is not as sensitive to wet winters as other varieties. The narrow size of 18-24 inches wide can fit into tight spaces in the garden. The height varies between 24-36 inches. Agastache 'Golden Jubilee' can be grown from seeds, but I haven't noticed any seedlings and I didn't collect seeds last fall.
I count on agastache for deer and rabbit resistance as well as low water and low maintenance requirements. In my garden, agastache ranks high as a reliable perennial with a long bloom season.
| Words and photos by Freda Cameron, Defining Your Home, Garden and Travel. All company or product or patented names mentioned are registered trademarks/copyrights/patents owned by those respective companies or persons. |
Garden Tips and News From Around the Web
It's time for a little more link love and I have some goodies for you.Here's a great garden seed planting chart (mostly for veggies) that will help you know how much space you'll need for the yields you have in mind: Seed Planting ChartTake a moment to check out my two new TLC articles: How to Grow Your Own Indoor Herb Garden How To Bring the Outdoors in With Indoor GardensIf you garden, and you
How to Grow Potatoes in Potato Planter Bag (2)
I wanted to show you the entire method of growing potatoes in planter bags now so you have a chance to try it in your garden this year. Yesterday's post showed the basic method of how to plant potatoes in bags. This is quite a useful no dig method for growing potatoes perfect for patio or small space gardening. Here is the second video that shows what your potato planter bag should look like
Monday, April 26, 2010
Inspiration and a Trio of Roosters
A few years ago, I purchased the decorating book, Carolyn Westbrook Home.

I really like her decorating style. It is a little French, a little country, a little cottage.
This picture below captured my attention, because of the rooster pictures (and the toile, ironstone, vintage books, rooster statue, etc.)

I already had two rooster paintings that Donna, of Donna's Art/Mourning Dove Cottage, had painted me.
So I asked Donna if she could paint one more. She said yes and a short while later, rooster painting number 3 arrived.

And here is how they all look together.

Thank you Donna! You made my inspiration picture come to life.
Welcome Home,
Penny
AND THE LARSON -JUHL WINNER IS...............


Having not known about this site (am I the only one?), you can count on this being pulled up for the next Phillips' Christmas drawing. :-)
CONGRATS VICKIE! AND THANK YOU STEVE McKENZIE OF LARSON-JUHL!
Debra
CityofOceanShores.com Newsletter ~ March 2010
 Beach Updates
 The Pacific Ocean is definitely the top draw in Ocean Shores, but there's much more to this beach town beyond its smooth shoreline and crashing surf. Ocean Shores boasts 23 miles of interconnected freshwater canals and lakes. Duck Lake is the big lake in Ocean Shores and is stocked and considered one of the best year-round fishing lakes in Western Washington. The lake is power-boat accessible and is excellent for many different boating experiences.

On April 24th, the fishing season begins and Duck Lake is a place that a lot of anglers frequent. The lake is home to a variety of fish including largemouth & smallmouth bass, bluegill, yellow perch, black crappie, rainbow trout, grass carp and other types of slimy fish. If for some reason you happen to catch a grass carp, put it back. Those guys eat the weeds (well, they're supposed too)...
There are two public parks on Duck Lake, each with its own public boat launch (launching your boat is free whether you live here or not):

Chinook Park is located on Duck Lake Drive about two and a half miles south of the airport. The park is 3.2 acres in size with a boat launch, ADA accessible fishing dock, large playfield, picnic tables, playground equipment, water fountain, portable restroom and a public parking area.
North Bay Park is located on Albatross and Chance a la Mer Avenue by the airport. The park is 7.1 acres big with a boat launch, fishing dock, baseball diamond with backstop/soccer field, tennis court, basketball goals, playground equipment, picnic shelter with fireplace and picnic tables, ADA restroom facility, plenty of parking space and excellent views of the Olympics and Grays Harbor across the nearby airport.
Ocean Shores Real Estate Update
Home and lot sales jumped in Ocean Shores during the month of March! The looming Federal Tax Credit deadline coming up has surely motivated some buyers to get off the fence. One of the telling signs with this month's sales figures is that for all three categories (homes, land & condos), sales transactions are pretty much flat (or increasing as lot sales did) compared to the same time period in 2009. This most definitely signals that the real estate market has finally bottomed out in first quarter 2010.
March Home Sales
Home sales jumped again at the beach as 17 Homes sold in March compared to only 9 in February. Average selling price was $147,100 - down from February's average price of $204,100. The cheapest was a bank-owned fixer that sold for only $30,000 while the most expensive was an oversized ocean view home that sold for $300,000. Average time on the market was 278 days. There are currently 36 homes that are pending right now - up from 34 last month at this time. Inventory is still increasing as there are 223 homes on the market now compared to 218 last month.
March Vacant Lot Sales
Lot sales in March more than doubled February's numbers as 18 Lots closed in March (up from 8 Lots in February) for an average sales price of $30,436. Average time on the market was only 446 days - down from last month's time on the market of 539 days. Eight lots are currently pending. There are 536 lots available on the market right now compared to 509 last month. Average price: $73,051. The cheapest one is now only $7,800, but bring some dump trucks with sand.... lots of sand...
March Condo Sales
Only 1 Condo closed in March for $62,000. Condo sales are very slow. Two condos in town are still pending while 98 condos are still active listings.
Quarterly Comparisons
* 30 Homes sold in the first quarter of 2010 for an average sales price of $159,867.
* 31 Homes sold in the first quarter of 2009 for an average sales price of $179,355.
* 35 Lots sold in the first quarter of 2010 for an average sales price of $25,484.
* 22 Lots sold in the first quarter of 2009 for an average sales price of $37,198.
* 4 Condos sold in the first quarter of 2010 for an average sales price of $96,225.
* 5 Condos sold in the first quarter of 2009 for an average sales price of $110,050.
Coastal Community Home Sales Comparisons
The real estate market in Ocean Shores continues to dominate the other areas on Washington's coast in regards to number of homes sold, etc. I would sure hate to be selling real estate in Westport...
* Ocean Shores sold 30 Homes in the first quarter of 2010 for an average sales price of $159,867.
* Westport sold 5 Homes in the first quarter of 2010 for an average sales price of $73,900.
* Seabrook/Pacific Beach/Moclips sold 2 Homes in the first quarter of 2010 for an average sales price of $375,000.
* Long Beach sold 12 Homes in the first quarter of 2010 for an average sales price of $168,862.

Ocean Shores Real Estate Brokerage Rankings
It's becoming quite clear to most real estate sellers & buyers in Ocean Shores that if you're serious about buying or selling real estate at the beach, you'll want to work with the office that delivers the best results. The following list is the top ten real estate brokerages and their percentage of real estate volume sold in Ocean Shores for the first quarter of 2010:
1. Coldwell Banker Ocean Beach Properties - 40.08%
2. Windermere RE Grays Harbor - 15.31%
3. John L. Scott Ocean Shores - 8.61%
4. Premier Realty Ocean Shores - 4.67%
The three other real estate brokerage in Ocean Shores didn't make it into the top ten, so I'll just stop at number four....
If you have any questions regarding Ocean Shores/North Coast Real Estate, call Jeff Daniel of Coldwell Banker Ocean Beach Properties at 360.581.9020 or visit my website at www.cityofoceanshores.com. Thanks! All statistics are supplied from the Northwest Multiple Listing Service.
Upcoming Events
Olympus Rally
April 24-25, 2010
Many of the top rally drivers in the nation will be on hand when the Olympus Rally returns to Grays Harbor on April 24-25. The third event in the Rally America series will be based, for the first time, in the Ocean Shores area. The Ocean Shores Convention Center will be the event’s headquarters. Racing enthusiasts can meet the drivers in a pair of public events, scheduled for 8 a.m. April 24 and 7 a.m. April 25 at the Ocean Shores Convention Center. http://www.thedailyworld.com/articles/2010/04/07/sports/doc4bbcbb6c1d64c535534372.txt
Razor Clam Dig Coming Up!
April 30-May 2, 2010
The Washington State Fish & Wildlife Department has tentatively scheduled a dig for the following dates and beaches. A final decision on the dig will be based on the results of tests for toxins to determine if the clams are safe to eat.
Friday, April 30, 8:32 a.m., -1.5: Long Beach, Twin Harbors, Copalis and Mocrocks
Saturday May 1, 9:15 a.m., -1.0 : Long Beach, Twin Harbors, Copalis, Mocrocks and Kalaloch
Sunday, May 2, 9:58 a.m., -0.7: Long Beach, Twin Harbors, Copalis, Mocrocks and Kalaloch
A license is required for anyone age 15 or older. Any 2009 annual shellfish/seaweed license or combination fishing license is still valid. Another option is a razor-clam only license available in annual or three-day only versions.
Beaches scheduled to open are:
· Long Beach, which extends from the Columbia River to Leadbetter Point.
· Twin Harbors Beach, which extends from the mouth of Willapa Bay north to the south jetty at the mouth of Grays Harbor.
· Copalis Beach, which extends from the Grays Harbor north jetty to the Copalis River, and includes the Copalis, Ocean Shores, Oyehut, Ocean City and Copalis areas.
· Mocrocks Beach, which extends from the Copalis River to the so
 uthern boundary of the Quinault Reservation near the Moclips River, including Iron Springs, Roosevelt Beach, Pacific Beach and Moclips.
· Kalaloch Beach, which extends from the South Beach Campground to Brown’s Point (just south of Beach Trail 3) in the Olympic National Park.
For more info, click http://wdfw.wa.gov/fish/shelfish/razorclm/season.htm.
Grays Harbor County Expo
May 27-31, 2010
Third annual expo featuring Oceans of Fine Arts, Arts & Crafts Show, Cruisin the Shores RV Show, Chainsaw Carving, Hotrod & Classic Car Show & a HOME SHOW! Something for everyone! Free & easy parking - Memorial Day Weekend - see you there! http://www.graysharborexpo.com/
Kite Challenge
June 5-6, 2010
Sponsored by "Team Cutting Edge Kites" - 2005 & 2006 World Champions. Free kite flying lessons, stunt competitions, fun flies, displays and more. Come to the beach and watch the sky come to life with hundreds of colorful kites!
Flag Day Parade & Dance
June 12, 2010
A chance to show your patriotic spirit. The parade features more than 75 entries and a Grand Marshall. End the day with dancing and raffle drawings. One of the only Flag Day parades in Western Washington.
Jeff Daniel
Associate Broker
Coldwell Banker Ocean Beach Properties
Cell Phone: 360.581.9020
749 Point Brown Ave NW
PMB 1568, Ocean Shores, WA 98569
360.289.3111 (fax)
Subscribe to:
Comments (Atom)


